Monday, June 20, 2016

Simplified Rename feature in Visual Studio 2015

Visual studio 2015 is a great IDE and I love all the latest features provided in this edition. I have always been a fan of refactoring features and with Visual Studio 2015 they are now more streamlined. In this blog post , we are going to learn about rename refactoring features. So Let’s get started.

We can use this renaming feature when we have found there is a spelling mistake in variable declaration and we want to rename that with correct spelling. This is the just scenario I have explained but there could be much more. So Let’s see how it works.

rename-feature-explanation

In above code, you can see that we have made some spelling mistake with employees variable and we want to correct it. So you select that variable and right click and select rename or you can press shortcut Ctrl+ R,Ctrl +R.

rename-features-streamline

Once you click on rename it will open the following dialog.
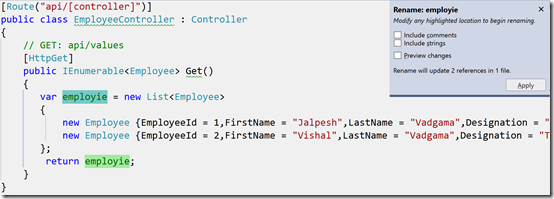
rename-feature-dialog-visual-studio-2015

This dialog contains three options.

  1. Include comments – which will replace this word in comments also.
  2. Include strings – Which will replace this word in the string which we have defined in double quotes.
  3. Preview changes – It will show a preview of changes we are going to make.
Now you can see the highlighted part in above where I’m going to change from employie to employees.

rename-feature-demo-visual-studio-2015

Now once you click on apply it will open a preview dialog like following.

employee-preview-dialog

Once you will click on apply it will apply the changes.

applied-changes-rename-features

That’s it. It’s very easy Hope you like it. Stay tuned for more!!.
Share:
Sunday, June 19, 2016

Execute in interactive with visual studio 2015 update 2

There are lots many times we need to play with C# Code and at that time, C# interactive  window might come handy.  Those who don’t know what is C# interactive windows, This is a REPL that allows you to execute the C# code in the separate window. You can enable that window via Views-> Other Windows –> C# Interactive.

csharp-interactive-windows-visual-studio2015

Once you click on it will open a window where you can write code and execute it. It will act as the play ground for your C# code.

csharp-playground-interactive-window-visual-studio15

Execute in Interactive with Visual Studio 2015 Update 2:

Earlier, When you need to use existing code with interactive window, you need manually copy and paste the code. Now with Visual Studio 2015 update 2, you have one menu available “Execute in Interactive”. You can right click your existing code and click on “Execute in Interactive”. It will load your code in C# interactive window.

execute-in-intreactive-menu-visual-studio-2015

Once you click it this code will be available to C# interactive window. Even you have a short cut for this also. Ctrl + E, Ctrl + E.

So it’s very useful. Hope you like it. Stay tuned for more!.
Share:
Saturday, June 18, 2016

How to use migration with Entity Framework Core

Entity framework core is  the lightweight, extensible and cross-platform version of Entity Framework. Before some time, Microsoft has Released a new version of Entity Framework RC2. I have written a couple of blog post about Entity framework code first migration earlier for Entity framework 6.0. So there was a couple of request coming for writing a blog post about Entity Framework Core RC2 migration. So I thought it will be a good idea to give an overview how database migration works in Entity Framework Core RC2. This post will cover a basic scenario where we are going to create the database with existing ASP.NET Identity migration and then we are going to create a new model and have that migration applied in the database.

How to use Entity Framework Migrations:

Let’s get started, To demonstrate entity framework core migrations, I am going to create a sample asp.net core web application like following.

creating-project-core-migration

Once we select asp.net core application it will appear the following dialog.

web-application-aspnet-core

Now when you create a sample application. It will basically create a boilerplate code for the asp.net identity and as a part of that it is going to create entity framework migration files under Data –> Migrations folder.

default-migration-entity-framework-core

Here you can find that sample code in GitHub repository given at the bottom.  Now we already asp.net identity migration code ready. So Let’s have those migrations applied with the following command from NuGet package manager console.

update-database
core-migration-aspnet-identity

Now let’s add a new model “Employee” like following.
namespace CoreMigration.Models
{
    public class Employee
    {
        public int EmployeeId { get; set; }
        public string FirstName { get; set; }
        public string LastName { get; set; }
    }
}
As we have employee class, We need to add migration for that. I’m going to create a migration for employee class via the following command.

add-migration AddEmployee
add-employee-migration

It will create “AddEmployee” migration class in Data->Migrations folder.

employee-migration-in-solution-explorer

And here is the code for the migration for the same.
using Microsoft.EntityFrameworkCore.Migrations;
using Microsoft.EntityFrameworkCore.Metadata;

namespace CoreMigration.Data.Migrations
{
    public partial class AddEmployee : Migration
    {
        protected override void Up(MigrationBuilder migrationBuilder)
        {
            migrationBuilder.CreateTable(
                name: "Employees",
                columns: table => new
                {
                    EmployeeId = table.Column<int>(nullable: false)
                        .Annotation("SqlServer:ValueGenerationStrategy", SqlServerValueGenerationStrategy.IdentityColumn),
                    FirstName = table.Column<string>(nullable: true),
                    LastName = table.Column<string>(nullable: true)
                },
                constraints: table =>
                {
                    table.PrimaryKey("PK_Employees", x => x.EmployeeId);
                });
        }

        protected override void Down(MigrationBuilder migrationBuilder)
        {
            migrationBuilder.DropTable(
                name: "Employees");
        }
    }
}

Now we have our migration class ready so I am going to run the update-database command as following.

update-database-employee-migration-entity-framework-core

Now let’s check the database again and You can see employee table is there.

database-after-employee-migration

That’s it. It’s very easy. Hope you like it. Stay tuned for more!!.

You can find complete source code of this application at following location on Github - https://github.com/dotnetjalps/EntityFrameworkCoreMigration
Share:

Support this blog-Buy me a coffee

Buy me a coffeeBuy me a coffee
Search This Blog
Subscribe to my blog


My Mvp Profile
Follow us on facebook
Blog Archive
Total Pageviews