SQL Server is a database server developed by Microsoft, the primary function of which is to store and retrieve data in the database MDF and NDF files. It retrieves data as requested by several software applications running on same or different computer across a network. Plus, it has a lot of concurrent users. Aimed at various enterprise segments, it caters to different workloads ranging from a small single-machine to large Internet-facing applications.
Although data on it is stored in a safe and secure manner, yet there are instances when it’s MDF and NDF files get damaged or turns inaccessible due to one or more reasons. Moreover, this happens irrespective of the SQL Server versions that can be 2016, 2014, 2012, 2008, etc. When they get damaged, they come up with several and unique error messages. Such a situation restricts you from accessing the stored data of the database. This creates the necessity for using a third-party software that can repair both these files and extract the complete data out of it. Here, Stellar Phoenix SQL Database Repair would serve the purpose. Let’s look at how.
Developed and marketed by Stellar Data Recovery, Stellar Phoenix SQL Database Repair is a software the purpose of which is to repair the damaged or corrupt MDF and NDF files of Microsoft SQL Server and save all the extracted data in multiple formats such as MS SQL, HTML, XLS and CSV. Here, we present to you a review on this product for you to get in-depth details about it. With this, you can check whether the software achieves your purpose of perfectly repairing the database files and recovering the entire data; and, that whether you can use it in case the primary MDF and secondary NDF files of the SQL Server database gets damaged or turns corrupt.
First, it is imperative to acquaint with its salient features as well as benefits. Let us look at the features and benefits embedded in the software.
· It can repair the damaged or corrupt MDF and NDF files of your SQL Server database.
· It can search for MDF files on the PC and repairs it successfully.
· It can retrieve almost all the database components ranging from Tables, Triggers, Views, Rules, Keys, Indexes, to Defaults.
Note - The Keys that can be recovered are Primary Keys, Unique Keys, Foreign Keys, and Identity, while the Indexes that can be recovered are both Clustered as well as Non-clustered indexes.
· It can recover both ROW and PAGE compressed data of the SQL Server database files.
· It has an exceedingly fast Scan feature with which you can scan the damaged MDF and NDF files.
Note - With this, you can identify and fix the issues quickly and recover all the data objects without fail.
· It allows you to preview the objects that can be retrieved and appear as a scan result after the end of the scanning process.
· It connects to the server automatically when interrupted for completing the repair process and restoring the data.
· It can even recover the Deleted records by using the remarkable feature embedded in the software.
· It offers you the option to move and save database files to Live SQL Database after the repair process gets over.
· It gives you the option to save the fixed database files in multiple formats such as CSV, XLS, and HTML in addition to MS SQL.
· It supports the latest released version i.e. MS SQL Server 2016 in addition to lower releases such as MS SQL Server 2014, 2012, 2008, and all others.
Now, to be able to execute these features and avail the benefits of this software when you have a damaged or corrupt MS SQL Server, your system must fulfil minimum system requirements, which are as follows
· The system must be embed with Pentium Class processor only.
· The supported operating system are Windows 10, 8, 8.1, 7, Vista, and XP as well as Windows Server 2008/2003.
· The system must possess a minimum of 1 GB memory; however, the recommended size is 2 GB.
Lastly, the free space in the system hard drive should be at least 50 MB to get the software installed correctly.
Note - These system specifications are easy to achieve and almost all Windows systems possess these minimum system specifications by default.
Select, Repair, and Save are the three most important steps that you need to carry out with this software to successfully repair the damaged SQL database files.
· Select – As displayed in the image below, with the ‘Select Database’ option that is present in the interface of the tool; you need to select the damaged database file from any location in your system. However, if you do not know the same, you must use the ‘Search in Folder’ and ‘Find’ tab to search and find all the database files. If you want to locate the file in subfolders as well, you must mark the option ‘Search in subfolders.’ Further, to scan for and recover the deleted records, you must check the ‘Include deleted record’ option.

· Repair – Once you have selected the database MDF file, you must click on the ‘Repair’ button to scan the MDF file. With this, you get a list of all the recoverable objects as shown in the image below. Further, you can select the ones for which you require a preview.

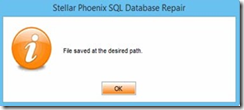
· Save – Finally, there is a message that the selected SQL database file has been successfully repaired, and the software prompts to click on the OK tab to save the file in a new database. This is the third and last step that you have to follow with the software. When you do this, you get options to save the file in MS SQL, HTML, CSV, and XLS that you can select as per your choice. Next, it gives you the option to save in ‘New database’ and ‘Live database’, and again you can choose as per your requirement. Finally, the retrieved objects of the SQL Server database file get saved. The images below display the ‘Saving’ step.
User have four options to save the database.
· MSSQL
· CSV
· HTML
· XLS

After selecting MSSQL, two options are there
· New Database
· Live Database

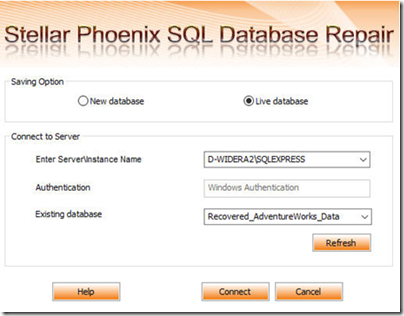
Choose any options from these two and save the database.
Although data on it is stored in a safe and secure manner, yet there are instances when it’s MDF and NDF files get damaged or turns inaccessible due to one or more reasons. Moreover, this happens irrespective of the SQL Server versions that can be 2016, 2014, 2012, 2008, etc. When they get damaged, they come up with several and unique error messages. Such a situation restricts you from accessing the stored data of the database. This creates the necessity for using a third-party software that can repair both these files and extract the complete data out of it. Here, Stellar Phoenix SQL Database Repair would serve the purpose. Let’s look at how.
Developed and marketed by Stellar Data Recovery, Stellar Phoenix SQL Database Repair is a software the purpose of which is to repair the damaged or corrupt MDF and NDF files of Microsoft SQL Server and save all the extracted data in multiple formats such as MS SQL, HTML, XLS and CSV. Here, we present to you a review on this product for you to get in-depth details about it. With this, you can check whether the software achieves your purpose of perfectly repairing the database files and recovering the entire data; and, that whether you can use it in case the primary MDF and secondary NDF files of the SQL Server database gets damaged or turns corrupt.
First, it is imperative to acquaint with its salient features as well as benefits. Let us look at the features and benefits embedded in the software.
Features & Benefits:
· It can repair the damaged or corrupt MDF and NDF files of your SQL Server database.
· It can search for MDF files on the PC and repairs it successfully.
· It can retrieve almost all the database components ranging from Tables, Triggers, Views, Rules, Keys, Indexes, to Defaults.
Note - The Keys that can be recovered are Primary Keys, Unique Keys, Foreign Keys, and Identity, while the Indexes that can be recovered are both Clustered as well as Non-clustered indexes.
· It can recover both ROW and PAGE compressed data of the SQL Server database files.
· It has an exceedingly fast Scan feature with which you can scan the damaged MDF and NDF files.
Note - With this, you can identify and fix the issues quickly and recover all the data objects without fail.
· It allows you to preview the objects that can be retrieved and appear as a scan result after the end of the scanning process.
· It connects to the server automatically when interrupted for completing the repair process and restoring the data.
· It can even recover the Deleted records by using the remarkable feature embedded in the software.
· It offers you the option to move and save database files to Live SQL Database after the repair process gets over.
· It gives you the option to save the fixed database files in multiple formats such as CSV, XLS, and HTML in addition to MS SQL.
· It supports the latest released version i.e. MS SQL Server 2016 in addition to lower releases such as MS SQL Server 2014, 2012, 2008, and all others.
Now, to be able to execute these features and avail the benefits of this software when you have a damaged or corrupt MS SQL Server, your system must fulfil minimum system requirements, which are as follows
· The system must be embed with Pentium Class processor only.
· The supported operating system are Windows 10, 8, 8.1, 7, Vista, and XP as well as Windows Server 2008/2003.
· The system must possess a minimum of 1 GB memory; however, the recommended size is 2 GB.
Lastly, the free space in the system hard drive should be at least 50 MB to get the software installed correctly.
Note - These system specifications are easy to achieve and almost all Windows systems possess these minimum system specifications by default.
Working:
The working of the software is described here and takes you through the steps to repair the corrupted MDF & NDF files of MS SQL Server.Select, Repair, and Save are the three most important steps that you need to carry out with this software to successfully repair the damaged SQL database files.
· Select – As displayed in the image below, with the ‘Select Database’ option that is present in the interface of the tool; you need to select the damaged database file from any location in your system. However, if you do not know the same, you must use the ‘Search in Folder’ and ‘Find’ tab to search and find all the database files. If you want to locate the file in subfolders as well, you must mark the option ‘Search in subfolders.’ Further, to scan for and recover the deleted records, you must check the ‘Include deleted record’ option.

· Repair – Once you have selected the database MDF file, you must click on the ‘Repair’ button to scan the MDF file. With this, you get a list of all the recoverable objects as shown in the image below. Further, you can select the ones for which you require a preview.

· Save – Finally, there is a message that the selected SQL database file has been successfully repaired, and the software prompts to click on the OK tab to save the file in a new database. This is the third and last step that you have to follow with the software. When you do this, you get options to save the file in MS SQL, HTML, CSV, and XLS that you can select as per your choice. Next, it gives you the option to save in ‘New database’ and ‘Live database’, and again you can choose as per your requirement. Finally, the retrieved objects of the SQL Server database file get saved. The images below display the ‘Saving’ step.
User have four options to save the database.
· MSSQL
· CSV
· HTML
· XLS

After selecting MSSQL, two options are there
· New Database
· Live Database


Choose any options from these two and save the database.